Monday, December 31, 2012

New Year, New Goals

So we all do this... hey its the new year!  Every year I make all kinds of grandiose resolutions that I rarely keep. All sorts of things from exercising more to eating healthier to keeping up with the laundry (and there are only two of us, so laundry shouldn't be that big of a deal, but it is.) It gets to the point where you wonder, why should I bother making resolutions? I never keep them. After the initial bang of excitement and bright lights, they go up in smoke. Like fireworks. Pretty while they last, right?

But lets take a step back and analyze that.  EVERY YEAR I make new resolutions. Every single year. Usually mental ones. "I'd really like to learn this." or "I want to weight lift." or "I plan to cook at home more often." But I make them EVERY YEAR. What does that tell you? That there are tons of things I WANT to do and I WORK on (if only on the short term). How is this possibly a bad thing? Working towards continual improvement in my personal, academic, and social life. So what if they fizzle? At least I'm trying.

Supposedly, in response to a reporter's question, Thomas Edison said this:

"I have not failed 700 times. I have not failed once. I have succeeded in proving that those 700 ways will not work. When I have eliminated the ways that will not work, I will find the way that will work."

Well, I have succeeded in proving that several methods of organizing my home and finances do not work.  Last year I created a "Master Plan" notebook based off a blog I found, with printable sheets from that blog. That is all well and good, but I don't want to have to re-handwrite my chore chart every single week without failure. I don't want to hand write everything. Some stuff is okay. But if I'm in a hurry, my handwriting is generally illegible. The problem? PDFs can't be edited unless you have a special program. 

The solution: A free online PDF editor. I downloaded organization sheets I thought might work for me from LifeYourWay and started uploading them to PDFescape. This lets me make basic changes to the PDF without starting from scratch to design my own to-do list or hand-writing everything. 

I know I sound like a bad infomercial right now, but with all the chaos of buying a house and moving this year, there are things I'm not doing (like I forget about one bill per month. oops.) Editing these to-do lists online will hopefully allow me more organization because next month I just have to open last month's and make a few minor changes. (Hint: I haven't found a "Save As" feature, so if you need a duplicate format for a different task, you'll have to upload it again under a different file name.)

The other change I'm making this year is to make my goals more specific, with deadlines, task lisks, and measurable accomplishments. A study at Dominican University proved that people who write down goals generally accomplish more than those that do not. Make a list, check it twice, cross off the ones you've completed and ADD MORE! Don't stop when you reach the end of your goals. There's always more interesting things to do! This also means that you don't have to have everything planned out by January 1. It is an ongoing process.

One of the things I did succeed over the last year is reading the Bible more. I have YouVersion on my phone. Every morning I try to get to work a little early, sit in my car, and read a couple chapters from the selected Bible Reading Plan. The app tracked my progress. I got through most of the New Testament in a year and every day that I opened it there was a little green progress bar that said "Hey, you're doing great, only x more to go!" Did I finish it? Nope. Did I read significantly more than the year before? Yep. So did I fail because I didn't complete the goal or did I win because I made progress?

I'm calling it a win. 

Friday, December 28, 2012

ARRGGHGHHHH!!!!!

By Kaelyn Angelfoot

This has without a doubt been the most frustrating crafty day I've had in a long time. I found this amazing paper piecing pattern for a quilt and I'm trying to convert it into a computerized version to make it easy to print. I have so far spent approximately four hours on this (and now I'm thinking it would have been easier to do by hand, but my stubborn streak kicked in) and I need to start over and tackle the project from a different angle.

Here is the quilt I want to make, with a link to the designer's blog.

http://charlottenewland.blogspot.com/p/pervalong.html
Each "block" is unique in design, so I can't isolate a few repeats and just make those. This quilt is really one large quilt block (3ft sq) and is completely brilliant in design. So I uploaded the complete pattern (found here) to EQ7 and proceeded to trace every single line and attempt to print a paper piecing pattern as a single block.

I don't really need to get into all the problems I had with it. Needless to say (but I'm going to say anyway) it was a nightmare and I finally admitted defeat (four tedious hours later.) I am going to take each of the subblocks the designer indicated and create a individual quilt block. This means... 62 separate quilt blocks. And this has just turned into a long term project. Wheeeeeee!

Thursday, December 27, 2012

Still in Over My Head

By Kaelyn Angelfoot

You know, like that song... "I'm in over my head, stuck in the red, something she said, it makes me think that I'm in over my head, over my head, over my head!"

Almost completed the tabard for my nephew but the bias tape I was putting on the collar is messed up. So now I have to tear it all off and get new bias tape. It is very frustrating to think you are done with a project and then have it backfire.


 So I moved on to something much less frustrating. And I made a lot of progress. I completed the piecing on my tree skirt (yes, I know, its already after Christmas.) Then I layered the sandwich and completed basic stitch in the ditch quilting along the radial spokes. I really like the way the quilting makes the tree-skirt look puffy and 3D
 Lastly, I created some bias tape from one of the fabrics in the skirt and started sewing it on! It is almost done.  
So nothing too exciting but I'm making progress. I've had a couple lazy days, but I'm enjoying them. No work until January 2!


Monday, December 24, 2012

I'm in Over My Head


By Kaelyn Angelfoot

We don't have a tree skirt for our Christmas tree, so I decided to make one. I was really interested in making a spiral bargello tree skirt, but I have limited time and resources. (Christmas is tomorrow!).
Here is a picture of the tree skirt I eventually want to make. See the link below if you are interested.

http://www.favecrafts.com/Christmas-Crafts/Spiral-Quilt-Christmas-Tree-Skirt#
 So in the meantime, I'm throwing together a quick tree skirt from material already on hand.
Its about half done with the piecing, but I will still need to quilt and bind it when the piecing is complete.Its a very small tree skirt, it will be about 30 inches across when completes. That's okay this time since our Christmas tree is relatively small and it will cover everything it needs to. When I make the Bargello skirt, I will want it to be much larger.

Tree skirt in progress

I also decided I wanted to make one of my nephews some medieval garb for Christmas. 

I need to have it done by Wednesday night because it gets on a plane on Thursday morning.  That is in addition to two other projects I would like to have done by tomorrow but that I won't mention here in case the intended recipients happen to glance at my latest article.

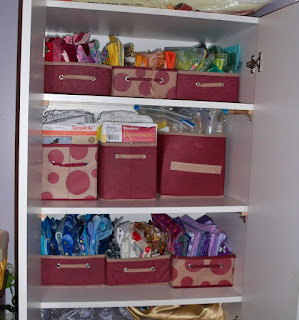
I also made a great dollar store find: little canvas drawers. They work great for storing fat quarters and patterns and I'm sure I'll find other uses as I continue to organize. In the meantime, I love my fabric closet!

Wednesday, December 5, 2012

Christmas!

By Kaelyn Angelfoot

I was bit by a Christmas bug yesterday after reading an article on inexpensive Christmas decorating. I've never done much decorating except for the usual tree and maybe some lights in the window, but I decided to give it a shot. Off to Salvation Army I went.

I focused on red and gold items. Our family room is rustic, with a wood burning stove and dark paneling. I found several great items and augmented them with some flowers from the dollar store and a lit garland.

The garland didn't stay where I originally had it due to issues with the hooks but I think I like it better behind the decorations. It really seems to pull the whole thing together, whereas before the decorations looked a little lost on my huge fireplace mantle. 


What I really need is a large picture or something to hang on the wall over the mantle. A project for another day!


Monday, December 3, 2012

So I Guess Black Friday Isn't All Bad....

By Kaelyn Angelfoot

Jack and I spent the last three days outside in the cold patching our driveway (buku points to Cynar for dropping in to help!). Its days like those that make me turn to Jack and say "Sooooo... still sure you don't want to move to Miami?"

Let me just start by saying, finally, a Black Friday Sale I can get excited about. I hate the idea of standing out in the cold for three days and then dealing with the crowds and getting mugged to buy Christmas presents the day after Thanksgiving. I prefer a nice quiet vacation weekend.
But...JoAnn's ran the world's best sale last weekend with fleece on sale for $3 a yard. Boom! I was there first thing Saturday morning (surprisingly, no crowds). Look what I got for less than $25.


I feel like I just won the lottery. That there is enough fleece to make about thirteen blankets of various sizes! Hello Christmas presents for my nieces and nephews.

I'm basing my blankets on this picture, from Project Linus:
And I already have two of them cut out. What I did was fold the paired fabrics in half and lay them on top of each other. I trimmed as necessary to make all side even and straight. From both the top and the bottom, I cut through all four layers using my rotary blade a strip nine inches wide. From this strip on the side with the raw edges, I cut off a nine inch square. Finally, on the large piece I cut another nine inch strip off the side with the raw edges. Do not ever cut the folded side. This left me with two blankets worth of fleece, the second being the inverse of the first.

Now I have to cut out three more sets and crochet them all together. Oh, and I only have two weeks for this whole thing.

 I've completed two blankets for Project Linus, the zebra striped one and one small monster baby sized blanket. 


The blue zebra blanket was practice. My crochet skills are rusty and minimal. This ended up being three rounds: 1) foundation single crochet, 2) single crochet, 3) double crochet, chain one, in every other stitch. It gave it a very nice crinkly look, I think in part because I used a larger crochet hook.

Friday, November 23, 2012

Project Linus: Day 1

By Kaelyn Angelfoot

So we had our first Project Linus day. Things didn't seem to go quite as smoothly as last year, but we still made some great progress. Rune made a no-sew fleece blanket with teal on one side and a really nice owl print on the other side. And I started my crochet-edged fleece blanket and worked on finishing my log-cabin triangle quilt.


The log cabin quilt is already quilted (I kept it basic, just traced the outline on the hexagons) and only needs the binding put on, which will be the same cream color as the background fabric. 

The crochet edged quilt is proving to be tricky. I seem to have overlapped my holes on occasion, which makes me glad that I placed them 3/4" from the edge as it give the edges a little more strength. I'll have to figure out a way to cut the holes more accurately next time. The skip-stitch blade worked very well, but I think the dense pattern of the fleece is what lent to the difficulty in cutting the holes.

JoAnns has their fleece on sale this weekend, at 2.99 a yard, so I'm hoping to pick some up early tomorrow and be able to experiment with it more.

So, just a quick update. I'll post the finished projects when they are done!

Sunday, November 18, 2012

Inspiration Board

By Kaelyn Angelfoot

Okay, again with the long delays between posts. The truth is, I still haven't quite recovered from my "I hate my job" crafting slump. Also, a lot of my crafting time has been spent (a) cleaning my house for the holidays (b) repairing our driveway, or (c) research! on crafty things.


Inspiration/Design board! (Not mine)
I have a million ideas and finally decided to make an inspiration board so that I don't forget any of them. First things first: supplies..... dum da dum dum!

Did some homework and found out that a lot of inspiration boards are made from cork boards. I didn't want to spend the money and lets be honest, we probably have enough junk around here that I shouldn't need to. When I went downstairs looking for foam board (we have at least a dozen sheets somewhere) I found ceiling tiles leftover from when Cynar graciously repaired our basement bathroom ceiling. Score!


Step 1: Cut to the correct size. I had one piece that was about a third of a tile and two full tiles. I cut one of the full tiles in half.
 
Step 2: Fabric. My sewing room is purple (its always a contest between purple and red for which color I like more but red makes a lousy craft room color as the pale version is pink. I don't particularly like pink.) So, I collected all my leftover purple fabric "scraps." Picked a piece and cut to size, leaving 3-4 extra inches on all sides.


Step 3: Put a thin layer of spray adhesive on the front of the ceiling tile. It just has to hold the fabric smooth while you staple, so it doesn't need to be gorilla glue grade.

Step 4: Iron fabric if necessary and lay over the board. Smooth out! Flip the board over carefully, fold the fabric over the edge and start stapling in place. I did one side at a time and checked to make sure the fabric was smooth before moving to the next.


I made three panels with three different fabrics. It looked a little bland when I was done, so I added some lavender lace (I have no idea where this lace came from. It just appeared in my stash one day.) And voila, a three panel inspiration board. I hung them up with 3M velcro sticky-tab thingies, but I'm not sure they will hold due to the fabric on the back. I also separated them slightly to achieve a modern art look, again, not sure I'll leave it like this. I think they may look better all squished together.


The center panel is covered with a crushed panne velvet in purple, the two outer panels are different shades of purple sateen leftover from the wedding fabrics. All for a cost of one hour of time and zero dollars.I may eventually want to add some sort of border to each panel, to give it a more finished look.

I plan on acquiring another desk for my computer at some point and putting it underneath my inspiration board. This is kitty-corner from my sewing table, so we'll have to see how things work out. I have a large closet right in the center of the back wall of my room, making furniture arrangements ... complicated.


Friday, November 2, 2012

Project Linus: More Easy Blankets

By Kaelyn Angelfoot

Okay, here we are again, with some more easy, quick, and cheap blankets for Project Linus.

Crochet Edged Fleece Blanket


This is a very simple blanket that requires a length of fleece, cut to the correct dimensions, a special rotary cutter or something to punch the holes, yarn, and a crochet hook. I'm approximating that this blanket will cost $10 to make, due to needing to purchase yarn and fleece. The complexity of the crochet along the edges if up to you, but I imagine this will be much easier than a traditional afghan because the fleece will give significant stability to the crochet stitch. I'm thinking about picking up the special rotary cutting blade for this project. Here is another blog (Handcrafting with Love) with more details. (My apologies to whomever I borrowed the above images from. I forgot to bookmark the site when I saved the pictures. Email me if they are yours, please).

Depending on the color combinations and the crochet stitch chosen, this can result in some pretty awesome looking blankets. This method can also be used to finish off the edges of a pieced fleece quilt. (Skip-Stitch Idea Page)

FYI, I did some research on the special Skip-Stitch rotary blade and if you want to purchase one, I would get it from the original manufacturer. All the knock-off blades I've found received very low user reviews.

Project Linus: "Simple Gifts" Striped Quilt

This quilt pattern is provided by Project Linus as an easy, any size quilt. It is great for beginners and requires minimal cutting and piecing. You don't have to take the time to quilt it, instead you can "tie" the quilt layers together with embroidery thread.

The patterns requires a couple yards of fabric and can easily be made from fabric you already have or can pick up in the clearance section at the fabric store. For quilts, a 100% cotton material is preferred. Material should be washed and dried before using. It requires only nine pieces to make this quilt and the color and pattern combinations are endless. An additional expense would be quilt batting, the inner warm layer of quilts.

Saturday, October 27, 2012

Project Linus: No-Sew Fleece

By Kaelyn Angelfoot

I've decided to start a series of posts about simple hand-made blankets that can be put together in as little as a couple hours (or a day for more complicated projects) in an effort to show how easy it is. I know a lot of people aren't crafty and it can be intimidating to think about putting together a hand-made blanket. There are also concerns about expense, so I will cover those also. All costs are estimated and will be based on JoAnn's retail price, because we can easily get 40-50% off coupons and the supplies we are looking at go on sale frequently.

Project Linus requires that the blankets be handmade because they've had countless thank-you letters from the children receiving those blankets expressing awe and amazement that someone would take the time to hand-make a blanket for them.

Basic No-Sew Fleece Blanket


This is the simplest  pattern, results in a blanket of any size you choose, and only requires a ruler, scissors (or rotary cutter & mat), seam ripper, and approximately 1 1/2 yards of 54" to 60" wide fleece (for a 50" x 50" finished blanket). Fleece costs $6.99 - $12.99 per yard, giving this a maximum cost of $11 - $21 per blanket without a coupon.With coupon or sale, it will be closer to $7 - $13 per blanket. The tutorial was provided by Project Linus.


Double-Sided No-Sew Fleece Blanket

JoAnn's No-Sew Fleece Kit
This requires twice as much fleece and you'll want to pick out two different patterns to make the blanket more fun.This requires the same tools as the Basic No-Sew Fleece Blanket and 1 1/2 yards each of two different fleeces. When you double the yardage, you also double the cost ($22 - $42 per blanket) which I why I wouldn't make this without a coupon or a sale. You can also purchase a kit from JoAnn's, which contains all the fleece you need for $33. The downside is you have fewer fabric options. The upside is that this kit is almost always on sale for half off, bringing your cost to $16.50. 
The tutorial was printed as a PDF from the blog "Confessions of a Homeschooler." 


Braided No-Sew Fleece Blanket

 (Single & Double-Sided)

This has the same fabric and tool requirements (and cost) as the single- and double-sided blankets above but has an interestingly different look. I found this tutorial on the "Helping Little Hands" website and converted them to PDF. The only additional required tool is a paperclip.(That should pique your interest...)


Additional Information

I almost NEVER buy anything at JoAnn's that isn't on sale or that I don't have a coupon for. The exceptions are notions and emergency supplies (thread, etc), because they aren't that expensive. If you add yourself to the JoAnn's mailing list, they will regularly email you nice coupons. Also, they have a Smartphone App (available for certain on Android phones) with re-usable coupons! A little extra time to hunt up a great deal is totally worth it.

Quick Update & NaNoWriMo

By Kaelyn Angelfoot


I know I've been quiet for a couple weeks. A lot of this is due to the fact that I've been having a very hard time at work and I don't feel like doing much creatively when I come home. And this week, its due to NaNoWriMo, which is fast approaching.... only 5 days to go!

I participated in NaNoWriMo last year and loved it, but it will burn the majority of my free time in November. For those who do not know, NaNoWriMo is National Novel Writing Month, run by the non-profit organization, The Office of Letters and Light. The challege is to write a 50,000 word novel (must be fiction) in the month of November. No, you don't have to finish, polish, edit, or complete the story - you just write. And write. And write! Check out the website, there is a lot of great information and a highly supportive participant base.

This year I am working on a novel based in the Dark Ages of Europe featuring characters from Norse Mythology and located in Scandinavia. It has been very challenging, as this topic requires extensive research into things such as climate, agriculture, mythology, social structure, religion, vikings, barbarian invasions.... I could go on forever. I imagine I will spend more time researching this novel than actually writing it!

Back to the Crafty Moments... last week I did finish two projects: Penguin Curtains for my mother-in-law (for her penguin themed room) and another miniature practice quilt, bequeathed to my niece for her stuffed animals (although I hear she uses it as an interior decoration item!).


Cross two items off my extensive list, add several more! Our halloween party is tomorrow and I don't have a costume yet, so I know what I'll be doing all day. That alone should be worth another blog entry.

Happy Crafting!


Sunday, October 7, 2012

UFOs and One Completed Object


By Kaelyn Angelfoot

My favorite UFO
I was reading a quilting blog about bargello quilts and came across the term "UFO stack" and realized, I have one! Only its not a stack, its scattered all over the place. And I'm perpetually looking for the next creative outlet, which means the stack typically gets bigger instead of smaller. UFO in the crafting world... Un-Finished Object. If you craft at all, I'm sure you know what I'm talking about.

So, I started making a list. And it is a long list. And the sad part is, some of the projects on the list I haven't technically started yet (planning stages), and I've come up with several I want to add to the list. Oh my goodness, if I could only quit my job and sew full time. So I had to make myself a deal. The list can be of static length. As soon as I complete a project, I can add another one! "The List" is sewing projects only. That means it does not include reading, writing (NaNoWriMo is next month! I still haven't completed my novel from last year), cleaning, organizing, cross-stitching, needlepoint, finishing up my house, experimenting with new recipes, or half a dozen other things. Yes, I have more things I want to do than I have time to do them.

So here is a small sampling of the projects.

Triangular log cabin
Practice quilt, using leftover kaleidoscope blocks
Dagorhir surcoat for me!
Not really sure where this one is going, although I love the pattern
Curtains for my mother-in-law.

Flannel quilt to donate

My very own design - a Penrose square quilt

Started this a year ago to donate, quilt top completed.
T-tunic in red for Jack. It was based on a pattern for a Roman short-sleeve shirt, but the collar is uncomfortable, so I need to merge it with another pattern to create a shirt that works.
 Other projects not pictured here: a watercolor landscape wall quilt (in the cutting stages); three medieval shirts for myself, long sleeve in purple, brown, and black; a heralding surcoat for Dagorhir practice; a knight's surcoat for Jack; Jack's Ranger Coat (needs sleeves, but I can't find the ones I had cut out); curtains for my craft room, and one more misc practice quilt, using purple diamond blocks that I found from a project about 10 years old and never completed.

I did finish one project! When I have more time, I'll post a tutorial on the details of quilt binding, because its not as complicated as all the tutorials make it seem. I finished my purple stripes practice quilt and gave it to my niece to use for her stuffed animals.

There are several obvious mistakes on the quilt, but it was a great learning experience and I know how to make it better next time. Most notably, the top is not quite square, the binding was too short and had to be patched, and some of the quilting has skipped stitches or tension issues. I'm very proud to have completed it so successfully anyway.

Monday, October 1, 2012

A Mess and a Half

By Kaelyn Angelfoot

Things always get worse before they get better (although this implies a perpetual cycle of worsening) and nothing more aptly describes that than my craft room. I barely have time to sew, let alone clean, but this weekend I reached a new low in messiness. It required immediate intervention before I could work on anything.


So as you can see, total chaos! Creative chaos, but at some point, entropy must be reversed through intelligent intervention.

First up was my thread box, which has been a perpetual nightmare. I purchased a spool holder at JoAnns. I got the large one that holds forty spools of thread because there is no way I have more than forty spools of thread.

Thread box before....
Thread box after!

Much to my surprise, it turns out I have at least 45 spools, but some of those are quilting spools so they have their own home.

Then I tackled a drawer on my tall storage unit.

Contents before...
Contents after! I can actually find my trim and buttons now.

Next I moved my big table to the other end of the room, added risers to my desk, and created a wonderful counter-height L-shaped crafty space that can hold both my sewing machine... and my design/cutting table! So I don't have to get up and walk over to the other end of the room every time I sew a seam.


And lastly, thanks to Jack who glued my foam quilting table together, I covered the foam with the vinyl and now I can quilt! 

Completed quilting table

The room still need major work, but its cleaned up enough that I can craft again! More updates to follow.