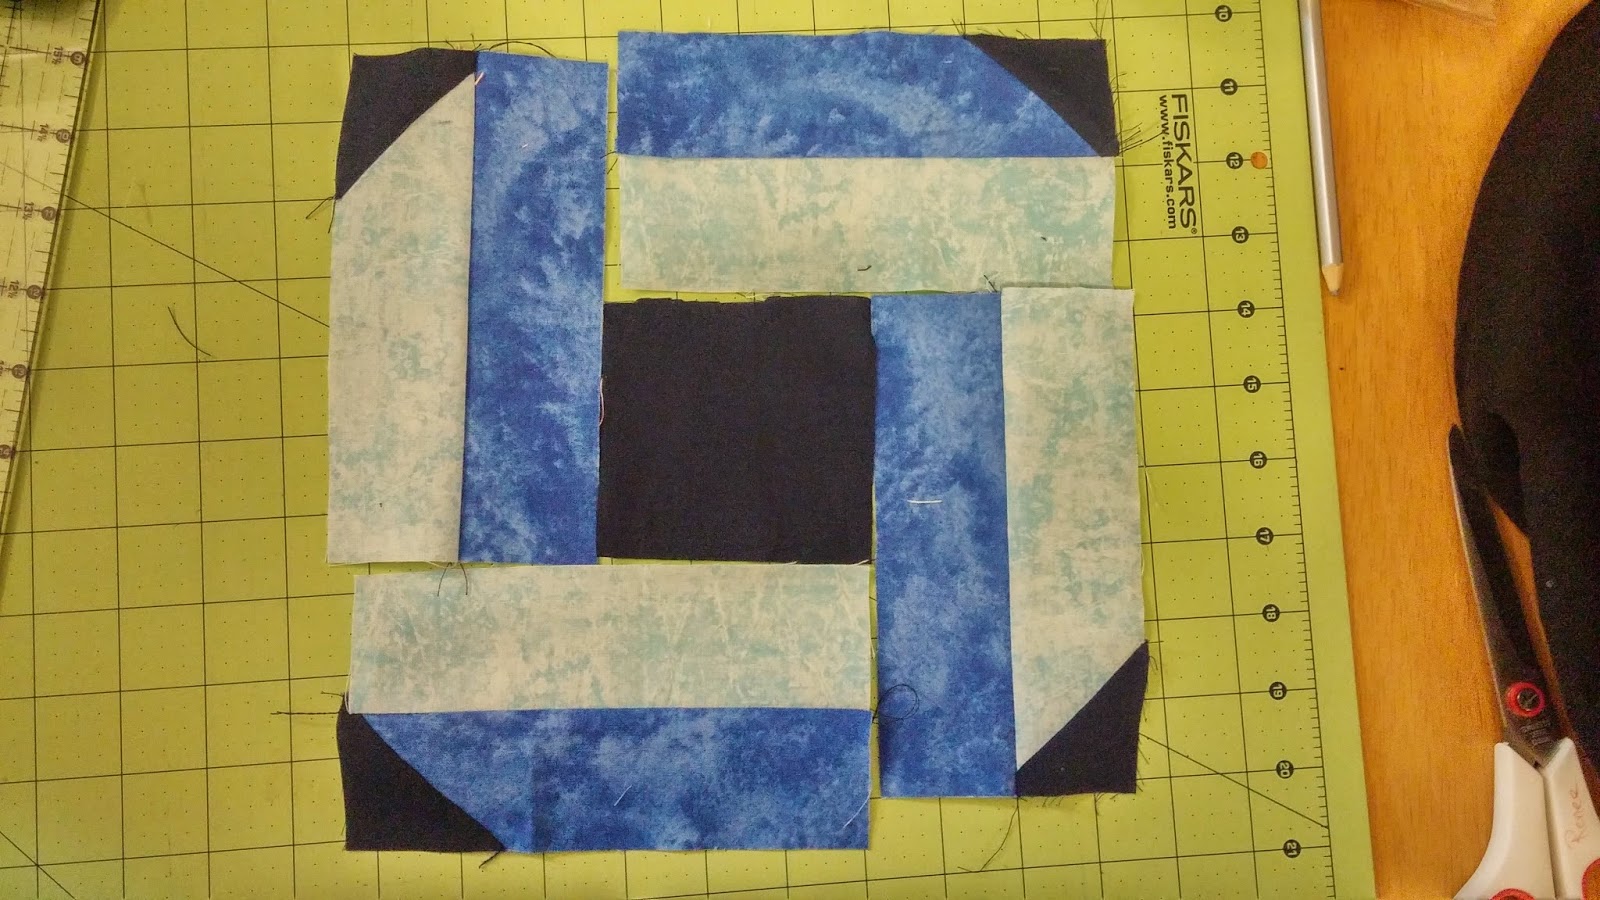
Tutorial on how to make this block available under my tutorials tab at the top of the blog.
Showing posts with label Penrose Square. Show all posts
Saturday, February 28, 2015
Thursday, February 26, 2015
Penrose Square Tutorial
There has been a little interest in how to build a Penrose Square block, so I'm posting a tutorial here for those that are curious. This tutorial will include partial seams but these are easy and should not intimidate you. I prefer this method to a nine-patch method because there are ALL ZERO seams to match.
This is the basic block we will be building today.
It is important to note that these blocks are chiral - they can be right handed or left handed so if you want them all identical, you must make them the exact same way every time or you will end up with mirror images.
You will need three different fabrics for each block, a light, a medium/dark, and a background fabric.
From the light fabric, cut four 6.5" x 2.0" blocks.
From the medium/dark fabric, cut four 6.5" x 2.0" blocks.
From the background fabric, cut one 3.5" x 3.5" square and four 2.0" x 2.0" squares
Draw a guide line from corner to corner on the 2" x 2" squares.
And now you're almost done! This is where the partial seams come into play. Lay out your pieces around your 3.5" x 3.5" center square.
Take a edge piece and the center piece and lay right sides together and stitch about 3/4 of the way along the edge starting in the corner. Leave about one inch unstitched.
Press the seam towards the black. Now take the next piece, line up your edges, and stitch the entire seam.
Press your seam. Your block should now look like the one below.
Repeat for the next edge section.
Now we are at the slightly tricky part. You need to stitch on the fourth edge section without catching the first edge section.
Press the seam. Now fold the first section over so that it lines up with the edge and stitch the remaining part of the seam.
And the block is done! Press the block and trim to 9.5" square.
That's all there is to it.
I personally like to set the blocks on point. I think it is easier to see the optical illusion when they are on point.
And then there is the option of sashing or no sashing, monochrome or multiple colors.
Here is my finished wall hanging.
I hope you have fun with this block! Please feel free to contact me with suggestions for making this tutorial better or questions you may have.
This is the basic block we will be building today.
It is important to note that these blocks are chiral - they can be right handed or left handed so if you want them all identical, you must make them the exact same way every time or you will end up with mirror images.
You will need three different fabrics for each block, a light, a medium/dark, and a background fabric.
From the light fabric, cut four 6.5" x 2.0" blocks.
From the medium/dark fabric, cut four 6.5" x 2.0" blocks.
From the background fabric, cut one 3.5" x 3.5" square and four 2.0" x 2.0" squares
Draw a guide line from corner to corner on the 2" x 2" squares.
Take two of the light pieces and two of the dark pieces and placing right sides together stitch corner to corner.
Trim to 1/4 inch from the diagonal seam.
Press the triangle towards the corner.
Next, stitch the remaining light and dark pieces to the opposite colored corner pieces. You should now have four partial blocks that look like this:
Take a edge piece and the center piece and lay right sides together and stitch about 3/4 of the way along the edge starting in the corner. Leave about one inch unstitched.
Press the seam towards the black. Now take the next piece, line up your edges, and stitch the entire seam.
Press your seam. Your block should now look like the one below.
Repeat for the next edge section.
Now we are at the slightly tricky part. You need to stitch on the fourth edge section without catching the first edge section.
And the block is done! Press the block and trim to 9.5" square.
That's all there is to it.
I personally like to set the blocks on point. I think it is easier to see the optical illusion when they are on point.
And then there is the option of sashing or no sashing, monochrome or multiple colors.
Here is my finished wall hanging.
I hope you have fun with this block! Please feel free to contact me with suggestions for making this tutorial better or questions you may have.
Friday, February 20, 2015
The Penrose Square Quilt
A few years ago when I took up quilting again, I was obsessed with the idea of optical illusion quilts. I read a couple of books on 3D perspective, optical illusions, higher mathematical dimensions, and Escher-like quilts. I loved the look of the Penrose Square and other impossible objects and thought they would make phenomenal quilts.
For those curious, here is a representation of a Penrose Square
I was unable to find a pattern for the Penrose sqaure and so I spent a couple of months with graph paper, paper piecing methods, strip piecing, and EQ7 developing my own pattern. I eventually settled on a nine-patch method but I found it inexact and cumbersome and set the project aside after making several blocks. I was disappointed with how they were turning out - somehow, they just didn't look as cool as I had imagined they would. Setting them on point helped significantly, but then I felt like there was too much empty space around the blocks.
I eventually found and tested a better partial seam method of making these, but by then I was disillusioned with the project and my research into pattern writing and copyright issues and abandoned the Penrose Square quilt to a shoebox in the back of my quilting closet.
I never did publish any photos or plans for this because at the time I was considering a side business as a pattern designer. However, given the prevalent world-wide drama with copyrights, PDFs, illegal copies, and VAT taxes, I have finally determined that I have no interest in entering or attempting to earn a profit from that particular field.
A recent diving trip into the depths of unfinished projects allowed the Penrose Square quilt to resurface and I decided to attempt to finish it into a wall hanging for my sewing room. Last night, I sandwiched and started the quilting. The empty space needed to be filled, so I choose brightly colored thread and a basic box filler design.
I'm learning to stitch straight lines with this quilt (although they are slightly crooked or curved more often than not), and I must admit that I like it a lot better with the quilting.
In this case, I think the quilting is really bringing the pattern to life.
For those curious, here is a representation of a Penrose Square
I was unable to find a pattern for the Penrose sqaure and so I spent a couple of months with graph paper, paper piecing methods, strip piecing, and EQ7 developing my own pattern. I eventually settled on a nine-patch method but I found it inexact and cumbersome and set the project aside after making several blocks. I was disappointed with how they were turning out - somehow, they just didn't look as cool as I had imagined they would. Setting them on point helped significantly, but then I felt like there was too much empty space around the blocks.
I eventually found and tested a better partial seam method of making these, but by then I was disillusioned with the project and my research into pattern writing and copyright issues and abandoned the Penrose Square quilt to a shoebox in the back of my quilting closet.
I never did publish any photos or plans for this because at the time I was considering a side business as a pattern designer. However, given the prevalent world-wide drama with copyrights, PDFs, illegal copies, and VAT taxes, I have finally determined that I have no interest in entering or attempting to earn a profit from that particular field.
A recent diving trip into the depths of unfinished projects allowed the Penrose Square quilt to resurface and I decided to attempt to finish it into a wall hanging for my sewing room. Last night, I sandwiched and started the quilting. The empty space needed to be filled, so I choose brightly colored thread and a basic box filler design.
I'm learning to stitch straight lines with this quilt (although they are slightly crooked or curved more often than not), and I must admit that I like it a lot better with the quilting.
It is about a third quilted now, and as it is a small quilt (2ft x 3ft) I don't expect it will take me very long to finish.
In this case, I think the quilting is really bringing the pattern to life.
Subscribe to:
Posts (Atom)